How to Use Airtable for Project Management? Our Secret Tips

Airtable is a versatile tool with many use cases, including project management, database management, customer relationship management, etc.
So, if you need a robust project management tool that you can also use for your different needs, get ready to revolutionize your work management with our ultimate Airtable guide!
In this guide, we’ll conver how to use Airtable for project management and share our personal experiences so you can master the fundamentals of Airtable and utilize it for your different work requirements.
First, we’ll cover Airtable basics: platform overview, pricing, account creation, user interface, and terminology. Then we’ll guide you on how to use it for project management and share tips for efficiency.
Mastering the Fundamentals of Airtable in 4 Steps
Step 1. An Overview of Airtable
Airtable is a highly versatile relational database management tool that can be used as a project management tool, CRM, and many more. Founded by Howie Liu in 2013 with a vision of offering businesses an exciting solution to the traditional notion of data management.
Airtable is akin to traditional spreadsheets. However, it goes beyond the conventional spreadsheet paradigm by providing advanced features such as linking data, creating customized views, and even building simple applications.
Over 300,000 organizations rely on Airtable to manage data, including popular brands like Spotify, Shopify, Autodesk, Intuit, Cole Haan, and West Elm.
Step 2. Airtable Pricing
Airtable comes with four pricing plans, including a free plan with basic features, and all the paid plans come with a 14-day free trial period.
After knowing what Airtable is and its pricing plan, it’s time to create an account and become familiar with its interface.
Step 3. How to Create an Airtable Account for Free?
And as we are learning, it would be ideal to get started with the free plan; you can later upgrade to its paid plan if needed.
To create an Airtable account for free-
- Go to Airtable’s official pricing page and click the “Sign Up” button for the free plan.
- Sign up using your email address, Google account, or Apple ID.
- Enter your name and create a strong password.
- Now provide additional information such as your use cases, add collaborators, import data (from Google Sheets, Microsoft Excel, or CSV File), set a color, and so on (optional) as they come up and continue.
- After continuing the steps, you will be landed on your first “base.” Now verify your email address to complete the account creation process.
Congratulations! You now have an Airtable account and are ready to learn the platform’s fundamentals.
Step 4. Become Familiar with Airtable’s Interface and Terminology
The following are the crucial terminology to know before using Airtable as a project management tool.
A. Airtable Workspace:
The workspace is the “Home” screen of Airtable, where you get access to all your information in a unified way. You can create multiple workspaces to keep your projects organized and separate. Under each workspace, you can create multiple bases!
B. Airtable Bases:
In Airtable, a base is a collection of tables where you can store and organize all your project information. Each base can have multiple tables and views.
C. Airtable Data/Table:
Inside Airtable databases, a table is where you store your information, such as tasks, resources, or notes. A table can be described as a spreadsheet with columns and rows; you can create up to 10,000 tables if needed (enterprise plan).
D. Field:
A field represents a “Column” in your table that you can use to specify the information type, such as text, Attachment, Checkbox, Date, Phone number, Email, URL, Barcode, and many more. And you can add up to 500 fields to your tables to specify the necessary information.
E. Record:
A record is a row in your table containing data for each field. To keep your project information up-to-date, you can add up to 100,000 records per base (enterprise plan), edit, and delete them.
F. View:
A view is a customizable way of seeing your data! Airtable offers different views, such as a grid, calendar view, or Kanban view. You can create multiple views for each table to display your data differently.
G. Automation:
Airtable automation is a feature that lets you take specific actions automatically, such as sending notifications or updating records. You can set up automation using pre-built templates or create your custom workflows.
H. Interface:
Interface Designer is a powerful tool that allows you to create a front-end of your data to present only the most relevant information to stakeholders and collaborators to take specific actions.
I. Extensions/Airtable Apps:
Extensions are third-party tools that can be added to your Airtable base to enhance functionality. Airtable offers many built-in and third-party apps, such as Google Drive, Slack, Trello, and more.
J. Templates:
A template is a pre-built base or table that you can use as a starting point for your project. Airtable offers various templates for different use cases, such as project management, event planning, customer relationship management, etc.
Well, there are some other tools, options, and terminologies, such as Airtable Universe, but knowing the above is enough to help you get started. Now let’s start our project management journey.
How to Use Airtable for Project Management? A Step-by-Step Guide

1. Create a New Workspace and a Base:
When you sign up to Airtable, you get a default workspace called “My First Workspace.”
But, as we start from the beginning, we will create a new workspace and a base for our project tracker from scratch.
To do that, go to your Airtable home by clicking the button on the top left corner of your screen. Once arrived, click on the “Create a Workspace button” from the top upper left corner, and give your workspace a name.
And after that, click on the “Create a base” button under your workspace to create a table. Now change the name of your base form, “Untitled,” to something else you want!
2. Set up Your First Table:
Once you’ve created your new base, it’s time to set up your table. While creating a base, Airtable will automatically create a blank table for you called “Table 1” with some fields (approximately 4).
Give that table a name and start editing those fields.
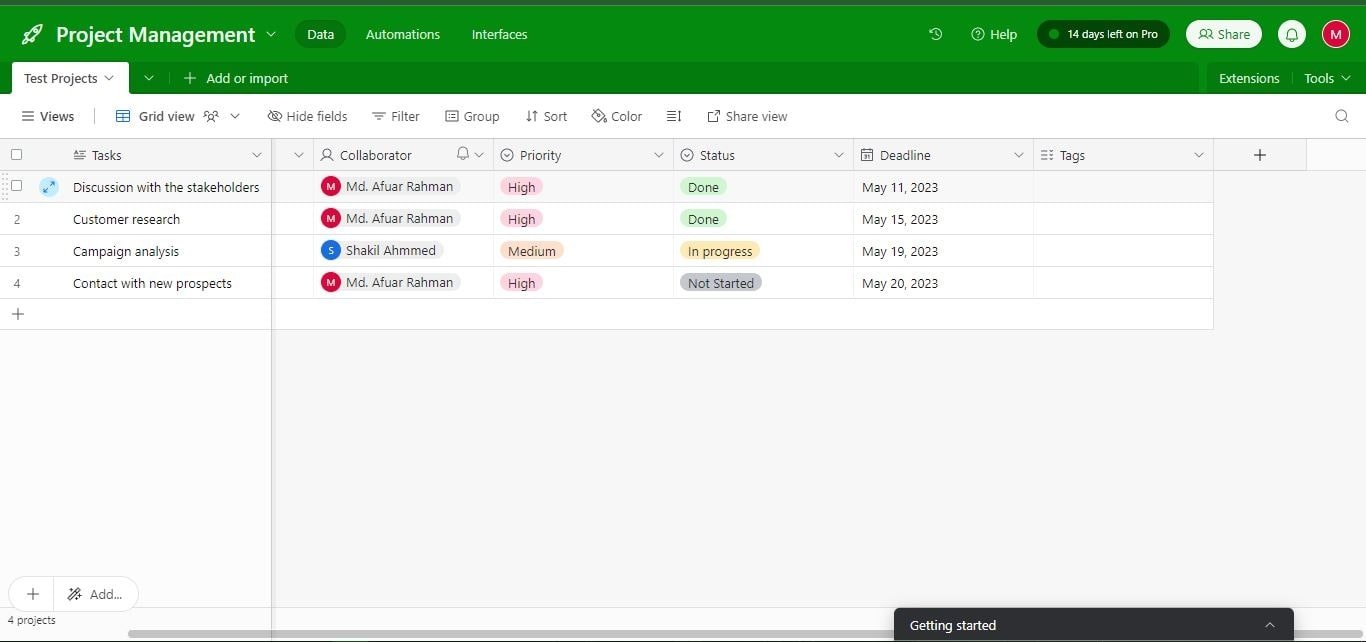
For our simple project tracker, let’s add six columns to our table, Tasks, Start Date, Collaborator, Priority, Status, and Deadline, to create a simple project management table.
To add six new columns, click on the drop-down icons of each pre-built column and delete them.
However, you can not delete the first column (A) as it is the primary field of the table!
Now click on the drop-down icon of the column and rename it (Edid Field) as “Tasks.”
Once you have done it, click on the “+” icon beside the first field to add the second field; give it the name “Start Date” and set the field type as “Date.”
Now Repeat this process to add four more fields:
- “Collaborator” as a “User” field.
- “Priority” as a “Single Select” field with options of low, medium, and high.
- “Status” as a “Single Select” field with options of Done, In-Progress, Not Started, and Stuck.
- “Deadline” as a “Date” field.
Once you have done it, your table will look like the image we shared with you at the beginning of the blog section.
3. Add Your Data:
Once you’ve set up your tables and fields, you can start adding your data. To add data on the existing records (rows) under each field, click on the row block and fill in the data.
In our example, give your tasks a name under the tasks field, double-click to set starting and ending dates under the “Start Date” and “Deadline” fields, and click to choose options for the “Priority” and “Status” fields.
And if you need to add more rows, click on the “+ Add a record” button at the bottom of the page and keep filling in your project data!
4. Change Your View:
Once you’ve added your data, you can try different views to display it. To try a new view, click the “+ Add a view” button at the top of the table.
Choose your preferred view, such as a Gantt chart, grid, calendar, kanban view, or gallery view. We used the “Grid view” in our project tracker example.
5. Collaborate with Your Team:
Once you’ve set up your base and added your data, you can invite your team to collaborate. To invite a collaborator, click the “Share” button in the top right corner.
Enter your collaborator’s email address, and choose the level of access you want to give them, such as view only, comment, or edit.
After adding team members, you can assign tasks to Airtable users by selecting their names and clicking “Collaborator block.”.
6. Automate Your Workflows:
Once you’ve set up your base and added your data, you can start automating your workflows using Airtable’s built-in automation system. To add automation, click the “Automation” button in the top middle corner and add a trigger and actions.
For example, choose a trigger “when a record is updated” and configure the trigger on the right sidebar by providing in which “table,” “view,” and “field” you want to set the automation!
After that, click on the “+add an action” button, set an action “send an email,” and provide additional details on the right sidebar, including the recipient’s email address, subject line, and message.
Now, whenever you change the status of the selected table, Airtable will automatically send an email to the collaborator with your message!
It’s fun; try it.
7. Add an Extension
As we know, Airtable allows you to add built-in, third-party apps, and custom scripts to your base to enhance the functionalities; let’s add a chart to our base.
To add a chart, click the “Extension” button in the top right corner and click the + add an extension button.
It will open up the “Extension Marketplace,” from where you can add multiple integrations to your base.
Now type “Chart” on the search bar and add it to your base; this will visualize your project data using graphs.
And that’s it!
Congratulations! You have created a basic project tracker in Airtable, and now it’s time to take your project management a step further with our secret tips:
Our Secret Tips for Using Airtable as a Project Management Tool
As there is a learning curve in mastering new software, following the three tips from our own experience will help you manage projects effectively:
1. Keep Exploring and Make your Hands Dirty:
In this guide, we just showed you the basics of Airtable; now, your duty is to create a similar project tracker as we showed you and then keep exploring and experimenting with its different features.
For instance, try different views, filters, and sorts to see how they affect your data. Use different field types and experiment with custom formulas to see how you can better organize and analyze your data. Such an endeavor will help you get the most out of Airtable.
2. Do not Use a Template at the beginning:
Airtable offers a variety of templates for different use cases, including project management. However, it is better to start with a blank slate and create your own custom project table as you need.
Because starting from scratch can help you better understand Airtable’s features, and later it will help you make the most out of its existing templates!
3. Continue Learning:
Airtable is constantly updating and adding new features to its platform. It is essential to continue learning to stay up-to-date and learn those new features.
Airtable offers extensive documentation, webinars, and community forums to help you improve your skills and stay current with the latest features.
Additionally, many third-party resources are available online, including YouTube tutorials and blog posts (from TheSoftReview, or others), that can help you optimize your use of Airtable.
Final Words
Airtable is a spectacular tool that can help you easily collaborate with your team, automate your workflows, and stay organized.
Its intuitive interface, powerful task management, and collaboration features make it a price-worthy solution for basic to complex project management needs.
In this Airtable tutorial, we discussed the fundamentals of the project management features within Airtable and created a simple project tracker.
And we believe this guide will help you start your Airtable journey, and you will uncover its true potential in the coming days.


