
How to Use Monday.Com and Get Projects Done Efficiently?

You made a wise choice in selecting Monday.com as your daily project management software.
Monday.com can literally assist you in streamlining your workflow, managing tasks and deadlines, and successfully collaborating with your team members when you know how to leverage its features.
In this discussion, we’ll instruct you on how to use Monday.com step by step, so you can set up your projects, manage tasks and team members and achieve your project goals.
We’ll also share some tips and best practices that can help you increase productivity while using Monday.com.
How to Use Monday.Com for Your Daily Project Management?
Monday.com is a versatile and easy-to-use work management platform (Work OS) that you can learn its powerful features within a few hours/days!
The following six steps will help you understand the basics of Monday so that, as a project manager, you can unlock its full potential over time.
Let’s get started.
Step 1. Open Your Monday Account

As you have decided to use monday.com as your project management software, the first step is to create an account on monday.com.
To open an account, visit Monday’s official website and click on the pricing section from the top menu bar.
After arriving at the pricing page, you will have to choose a pricing plan that suits your needs. Monday offers five different pricing plans, including a free plan (individual).
The free plan is suitable for primary use cases but lacks advanced features like automation. Likewise, the “Basic” plan also does not offer automation capabilities.
Thus, if you need advanced project management features, we recommend you choose the free trial of the Standard plan, which comes at $10 per user per month.
Creating an account is simple.
Just click on the “Try for free” button. It will take you to the registration page, where you will be asked to provide your work email address; after that, follow the prompts as they come, give some basic information about your company, and invite team members if you have one.
After completing these procedures, your account creation is done, and you will land on the Monday workspace page.
And before you proceed, make sure you verify your email address!
Step 2. Be Familiar with Monday’s Features and Key Terms
Once you have created your Monday account, it’s time to familiarize yourself with its work management tools and terms to understand the platform better.
A. Workspace:
The workspace is the central hub of your Monday.com account. The workspace serves as an umbrella that you can use to house your different projects. With Monday, you can create as many workspaces as you want, manage them, and quickly access your multiple projects to get a high-level view.
B. Board:
A board represents a specific project, workflow, or process you create in a workspace. It’s a customizable table comprising groups, items, sub-items, and columns. It allows you to break down your project into small tasks and track the progress. You can create multiple boards under your workspaces for your different projects!
C. Items:
Within a board, an item is a single task or a piece of information that denotes a small part of a big project. And under each board, you can add as many items as you need. An item can be assigned to a team member, given a due date, and have various other attributes. You can also add details such as files and comments and customize your items to fit your needs.
D. Subitem:
A subitem is a mini-task that is nested under an item. Sub Items can be used to break down large tasks into smaller, more manageable pieces. You can also use subitems to delegate work to different team members and to track progress on complex projects.
E. Column:
On Monday, a column is a data field (on the vertical section) representing information about an item on your board. Some common column types include status, due date, priority, time tracking, and team member assignments. You can add, edit, and customize columns to suit your team’s needs.
For instance, you can use the status column to represent which tasks are in progress, stuck, or done
F. Group:
A group is a way of categorizing items on your board based on specific criteria. For example, you may want to group items by project phase, team member, status, or priority level. Groups can help you organize and visualize your workflow, making tracking progress and identifying areas that need attention easier.
G. Views:
Views are the key features to learn. Simply put, views are different systems to visualize your boards or projects! And on Monday, several different views are available, like Kanban, Calendar, Timeline view, Gantt, and others. Each viewing system lets you see your projects in different ways.
For instance, the Kanban view displays your tasks or items as cards that can be dragged and dropped between different stages of your workflow. And the Gantt view shows your tasks as a timeline, and the Calendar view displays your tasks in a calendar format.
The default viewing system on Monday is a “Table View,” and you can change the main table view anytime you want!
H. Templates:
A template is a pre-built board or group structure that you can use as a starting point for your own projects. And Monday.com offers 200+ pre-made templates for different types of projects and workflows. For example, you get templates for CRM, HR management, software development, bug tracking, and many more!
These templates are customizable and can save you time by providing a pre-built structure for your board.
I. Automation:
Automation is a powerful feature on Monday.com that allows you to automate repetitive tasks and workflows. With Monday.com, you can set up automation to trigger when certain conditions are met, such as when a task is completed or when a due date is approaching.
Some examples of automation include sending reminders, updating status fields, and creating new tasks.
J. Analytics:
Monday’s “analytics” section lets you track your team’s progress and performance using graphs and charts. You can view metrics such as task completion rates, team workload, and project timelines. Also, you can create custom reports to analyze your data in more detail.
K. Integrations:
To enhance the overall functionalities, Monday.com integrates with many other tools and services, including Slack, Google Drive, Trello, and more. The integration capability lets you bring all your team’s tools and information into one centralized location. You add integrations to streamline workflows, save time, and increase productivity.
There are other teams to look at, but the above 11 will help you start. Now let’s learn how to add your first project on Monday:
Step 3. Create Your First Project
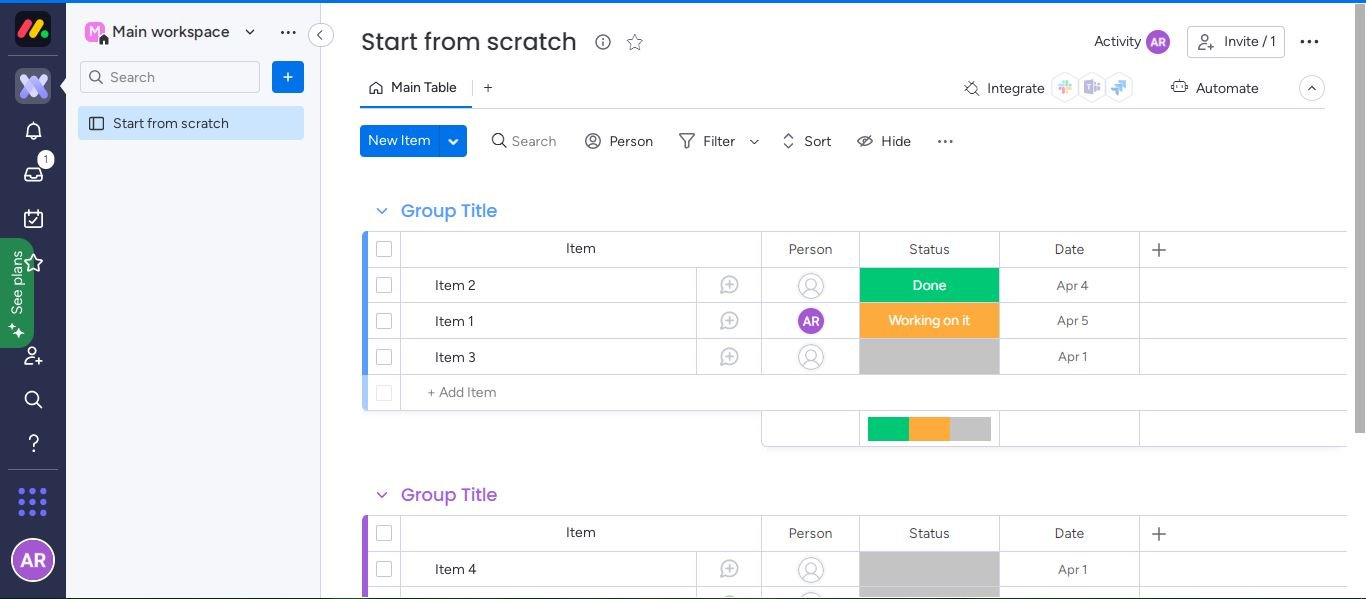
Once you have signed in and grasped the basics of task management features of Monday.com, now it’s time to create your first project.
To create your first project/board, go to your workspace, where you landed after signing up.
You can click the “work management” option from the left menu to access your workspace.
From there, you will see a dummy board called “Your first board.” Now click on the three dots beside it and delete it, as we will start over.
Once you delete the dummy board, your workspace is empty, and you will see options to start with a template or create a new board from scratch.
Click the “start from scratch” button, and Monday will take you to your new project board.
The first thing you want to do is give your board a name and description. It will help you keep track of what the board is for and what it contains.
- You will discover Groups, items, and columns on your board now
- Register all the small tasks that your project consists of by creating items within the Groups. Just click on the “+ Add item” button on the last part of each group.
- You can also add columns by clicking on the + icon on the left side of an item to assign team members, change a task’s status, date, and much more.
- Use Monday’s drag-and-drop feature to change the orders of each item and move items from one group to another.
- Change the name of your Groups that match your project’s phases, expand each item for communication, and add sub-items.
That’s it; you have successfully created your first project/board on Monday.com!
Now your job is to add all your tasks, keep exploring all the tools of columns, and play around.
Step 4. Automate Some of Your Routine Tasks
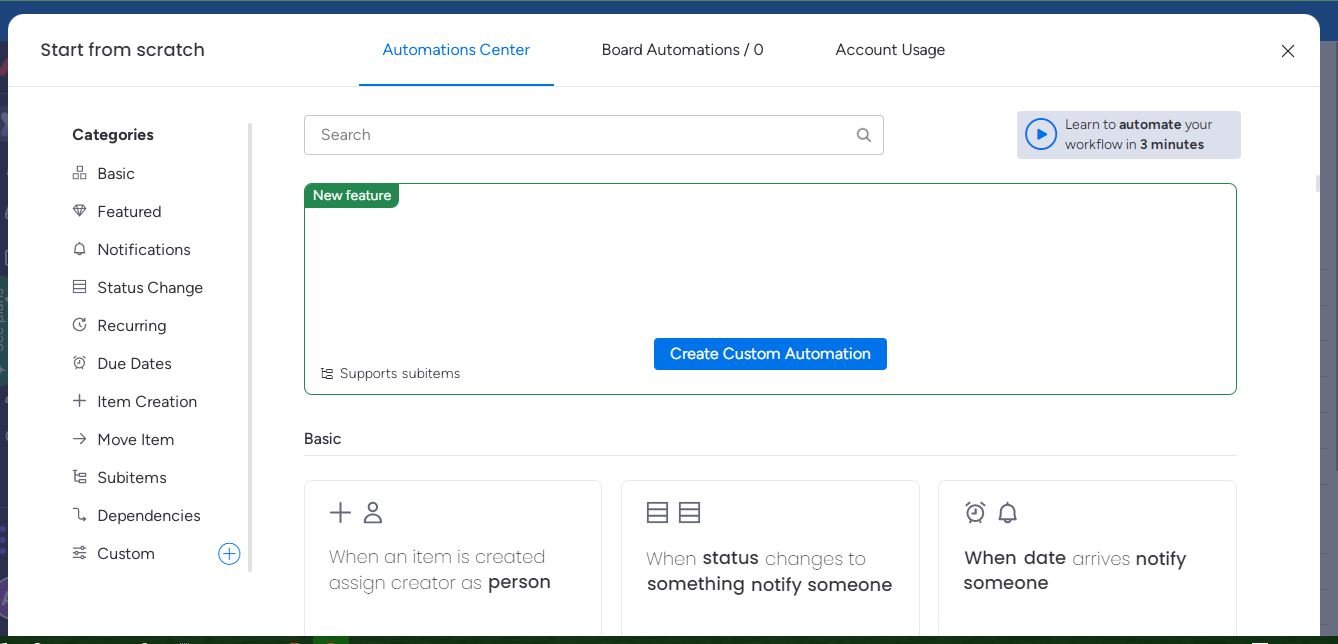
By this time, you have added all your tasks on your board, assigned team members, and added some columns to organize your tasks.
Now you can use Monday’s powerful automation feature to automate some of your daily tasks.
To use automation, click on the “Automation icon” from the top right corner of your board, and it will take you to Monday’s automation hub.
Once you are on Monday’s automation page, choose the automation recipe from your screen’s left corner that best fits your workflow.
Monday.com offers a variety of pre-built automation recipes under different categories, such as recurring tasks, notifications, setting dependencies, status updates, and more.
After selecting an automation recipe, choose your trigger and set your action (a trigger is an event that initiates the automation & action is the task that will be performed once the trigger is activated).
For instance, you have chosen a “Notifications” recipe and preferred the following trigger and action; “when an item is done,” send a notification to member “X” so that he can start his work.
That’s it. In this way, you can automate your routine tasks with Monday.com.
However, before you activate any automation recipe in your actual project, practice it on your dummy projects.
Step 5. Integrate Monday with Other Tools
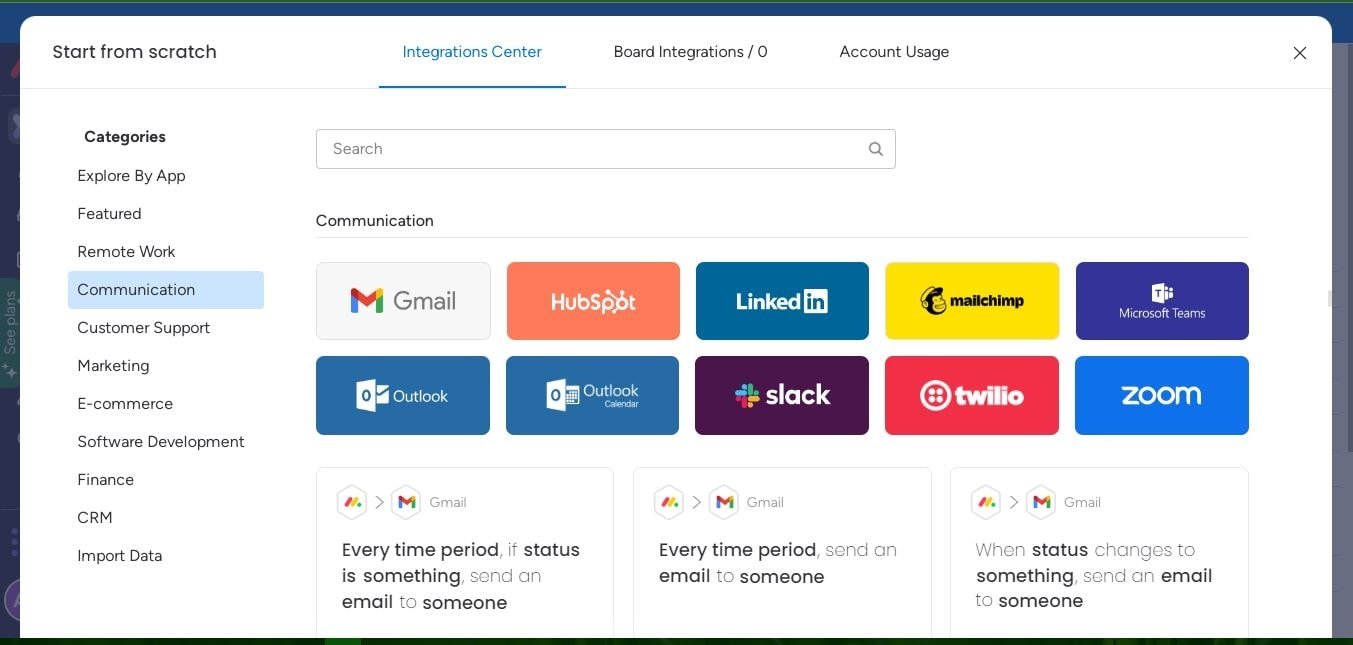
Integration is another cool feature of Money.com that allows you to connect your project management tool with other popular software platforms to access other apps necessary for your projects under one platform.
And Monday.com offers 250+ native integrations under different categories like marketing, communication, remote work, and more to connect.
To add integration to your board, click on the “integration icon” in the top right corner, which will take you to the integration page.
Search for the integration you want; you can also browse by categories.
After finding the integration, select it and follow the instructions as they come in, and you will finish the connecting process soon.
Step 6. See Analytics
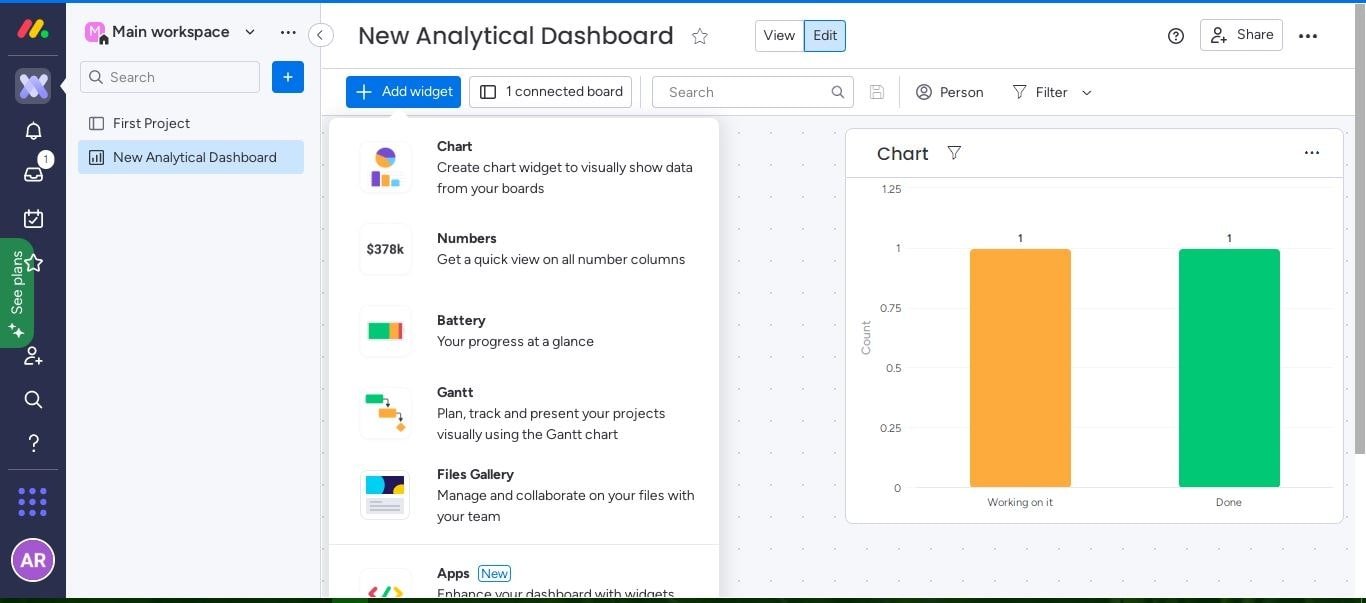
Monday.com offers robust analytic features to help to get a quick overview and powerful insights from your data.
To access Monday’s analytics tools, go to your primary workspace and Click on the “+ button” as you did before to create your first board.
After that, select the “New Dashboard” option and connect which board’s data you want to visualize. That’s it; it will take you to the analytic dashboard view page.
Click on the “+ add widget button” to add visual widgets to your analytical board, such as charts, numbers, and more.
Explore how each widget works and add them to your dashboard to visualize data. For instance, adding ” Charts ” will let you see how many tasks are completed and how many are in progress or stuck.
And adding the number widget will help you in the budget planning.
Monday allows you to drag and drop the widgets and add multiple data widgets and expand them to help you access more details of your data.
You can go through Monday’s knowledge base to learn more use cases of Monday’s analytical features and help you manage projects with data-driven decisions.
Final Words
Monday.com is among the most futuristic project management tools to help project managers collaborate with their teams and manage projects more efficiently.
By knowing the fundamentals of the software at the beginning, you can easily play with its customizable boards, columns, and automation features.
However, if you want to give your business processes and project management skills an extra edge using Monday.com, you must spend some time with the tool so that all the features become handy. And don’t forget to ask Monday’s support team if you need any help.
