How to Back Date Email? The Best Way That May Work in 2024!
You may need to send an email to a previous date for many reasons, but is it still possible in 2024?
When many outdated methods like changing the date of your pc and so on are floating online, finding a technique that may help you can be daunting.
However, configuring the SMTP server can help you to backdate your email (Gmail).
Key Analysis: How to Back Date Email?
To back date an email for Gmail, you have to configure your SMTP server using Burp Suite, SwitchyOmega extension, and install a CA Certificate. Combining all these will help you configure the SMTP server that will eventually let you modify the timestamp in your Gmail and send an email to a previous date.
Sounds complicated, right? To help you out, here we will provide you with a step by step guide to how you can do that.
How to Back Date Email by Configuring Your SMTP Server for Gmail?
Can we back date an email? Nope. It’s 2024, and mail servers are constantly updating their system to make email communication more secure.
However, in Gmail, there is a bug, and for that, you can change the timestamp and modify the send time.
Here is a step-by-step process below, but before that, let’s talk about what will you need to do:
Things That You Will Need To Configure the SMTP Server:
- A PC with a stable internet connection and Google Chrome installed in it.
- A running account of Burp Suite by PortSwigger and a CA certificate.
- The SwitchyOmega extension.
- An access to Epoch Converter
- A valid Gmail account.
After you have all the requisite items, now follow the steps to back date an email;
Step 1: Setting up Your Burp Suite
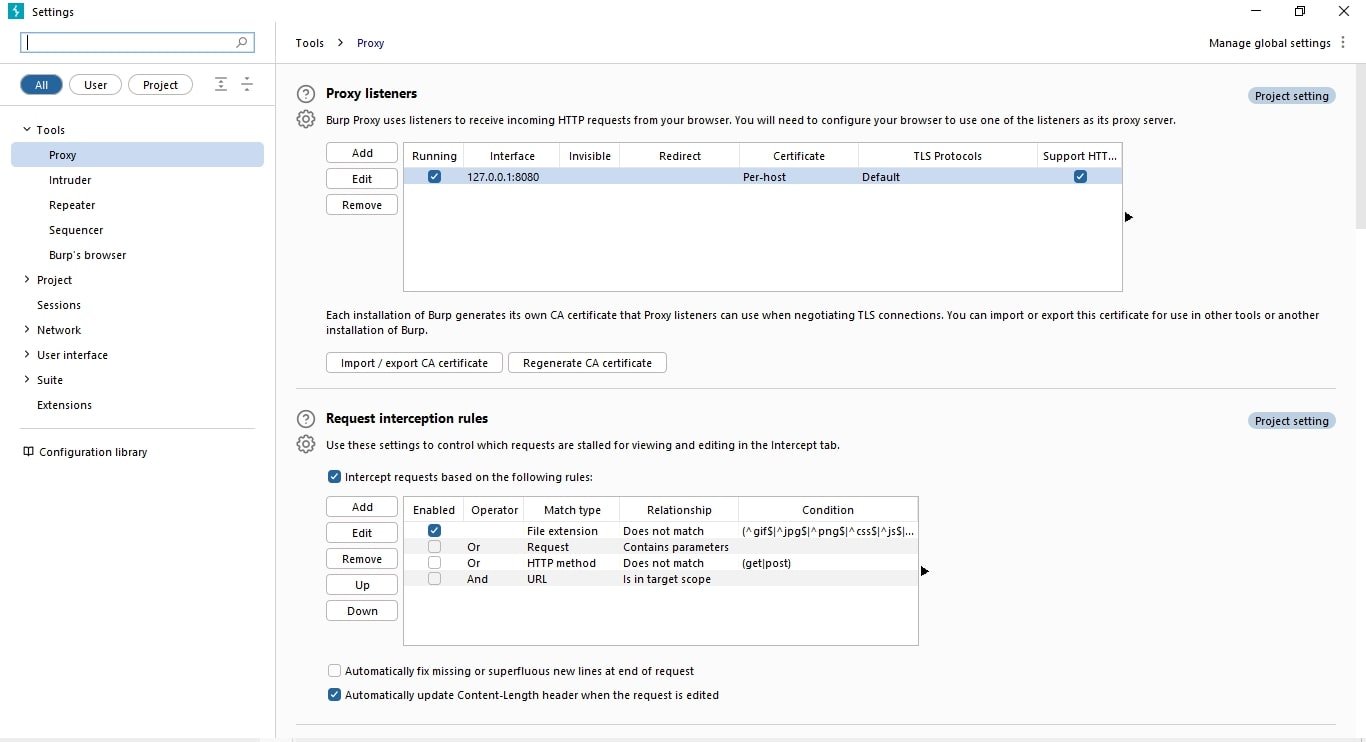
- To install the Burp Suite software, go to the official website of PortSwigger, and download and install the Burp Suite.
- You can download the Burp Suite Community Edition as well; it’s free.
- After downloading, install Burp Suite using its default settings and Start Burp (create a temporary project while installing).
- Once the setup completes, go to your profile, tap the Proxy button, and click on Proxy setting. You will find the server and port code here; now, copy the code. You will see a code like 127.0.0.1:8080. (where the port is 8080 and the server is 127.0.0.1).
Step 2: Install the SwitchyOmega Extension
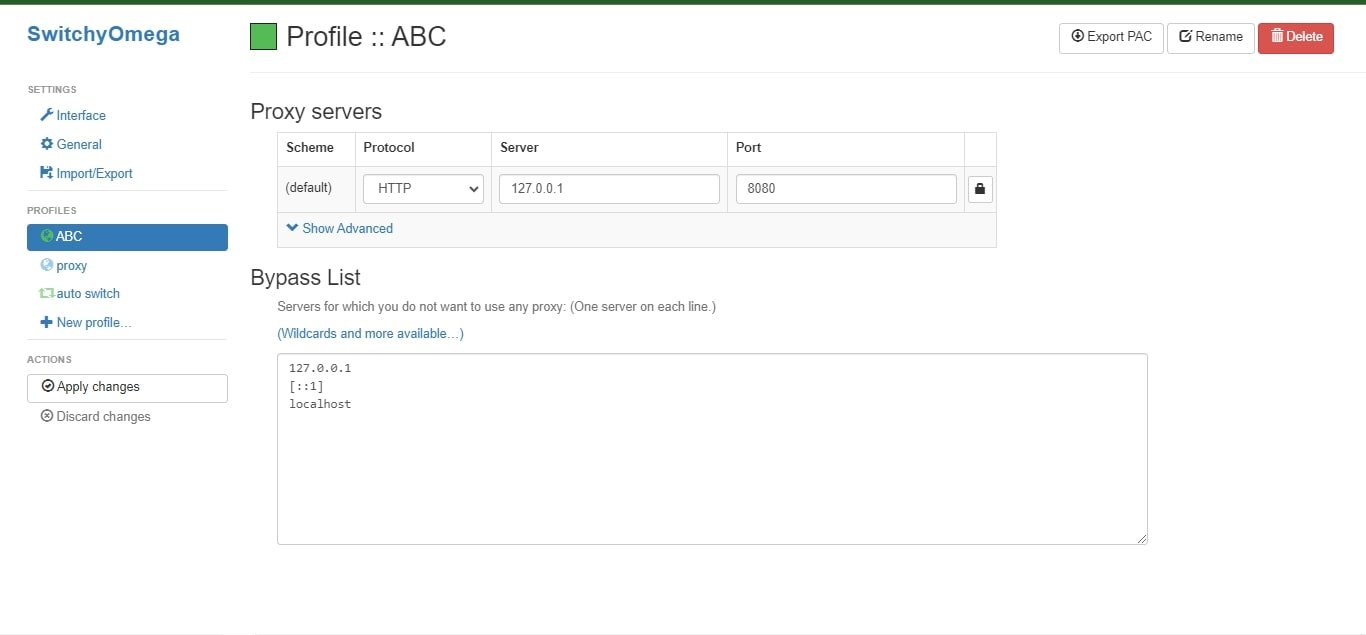
- Go to your Chrome web store and install the SwitchyOmega extension.
- Open the SwitchyOmega app and create a new profile under the profile section.
- Name the profile, select the Proxy Profile menu, and tap Create.
- Under the proxy server section, select the proxy protocol to HTTP and paste the server and port code you copied from the Burp suite.
- After pasting, click on apply changes.
Step 3: Install a CA Certificate
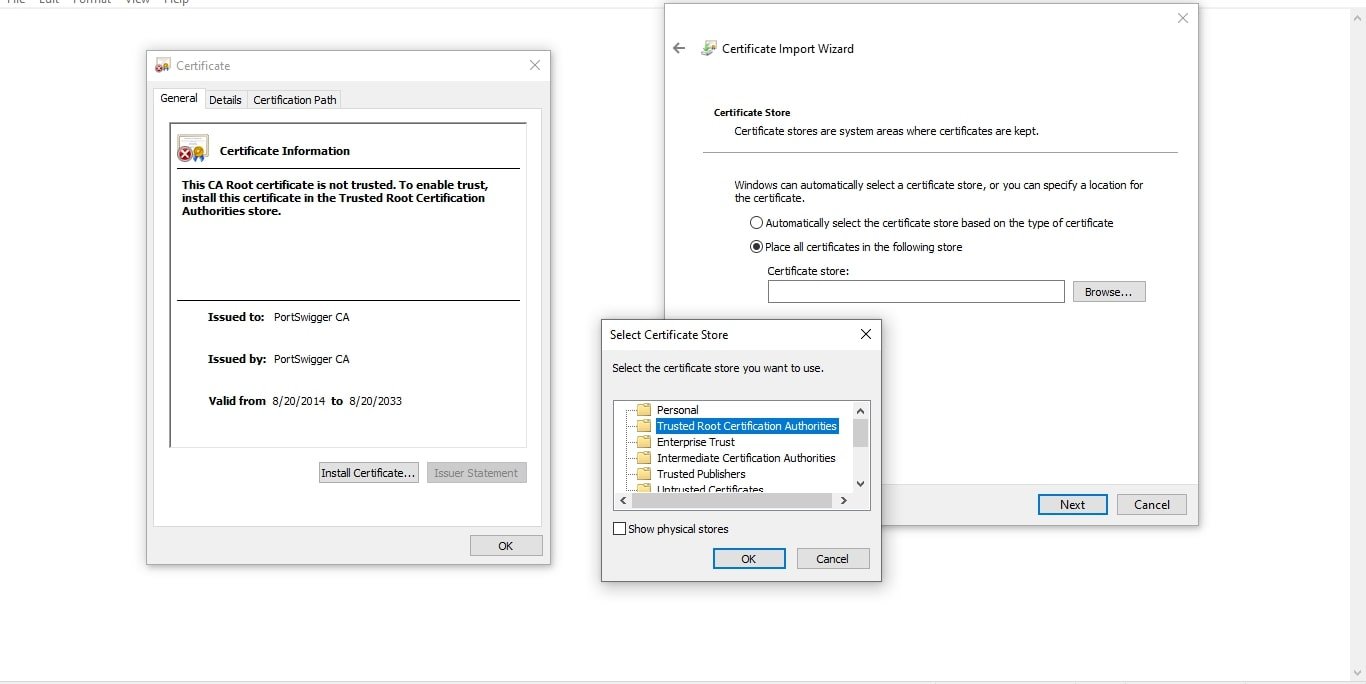
Now you will have to install a CA Certificate in your Google Chrome browser. To do that:
- Go to your Burp Suit’s Proxy tab and select the HTTP history tab.
- After that, the HTTP history is empty; now click on the “Open the Browser” button.
- After that, a browser will open. Now paste the server and port code (127.0.0.1:8080) in the URL, redirecting you to the Burp Suite Community page.
- Now select the CA Certificate and click on download.
- Now select the file you have downloaded and open it.
- Click on Install Certificate.
- Select the current user profile and click next.
- Select the second option and click to browse. Now Select the “Trusted Root Certification Authorities” and click next.
- Likewise, tap on the next button again and click Finish. You’ll now see an ‘import successful” message that means your installation was successful.
Once you have come this far, it’s time to modify the date of your email in Gmail.
Step 4: Sending an Email in Gmail on a Back Date
- Once you have reached this step, you will need a time converter, so open this epoch converter website in your browser. It will allow you to modify the timestamps in your Gmail.
- After that, open your Gmail in a separate tab and compose a new email to your desired email address.
- Now compose the email and after that, click on schedule and just pick a date (do not press send).
- Once you have done that, click on the SwitchyOmega extension icon and click the proxy profile you have created using the Burp Suite server and port address.
- This will let Burp capture the data and will manipulate the scheduling request.
- Now go to your Burp dashboard and select the proxy. Here you will see a dashboard like this-
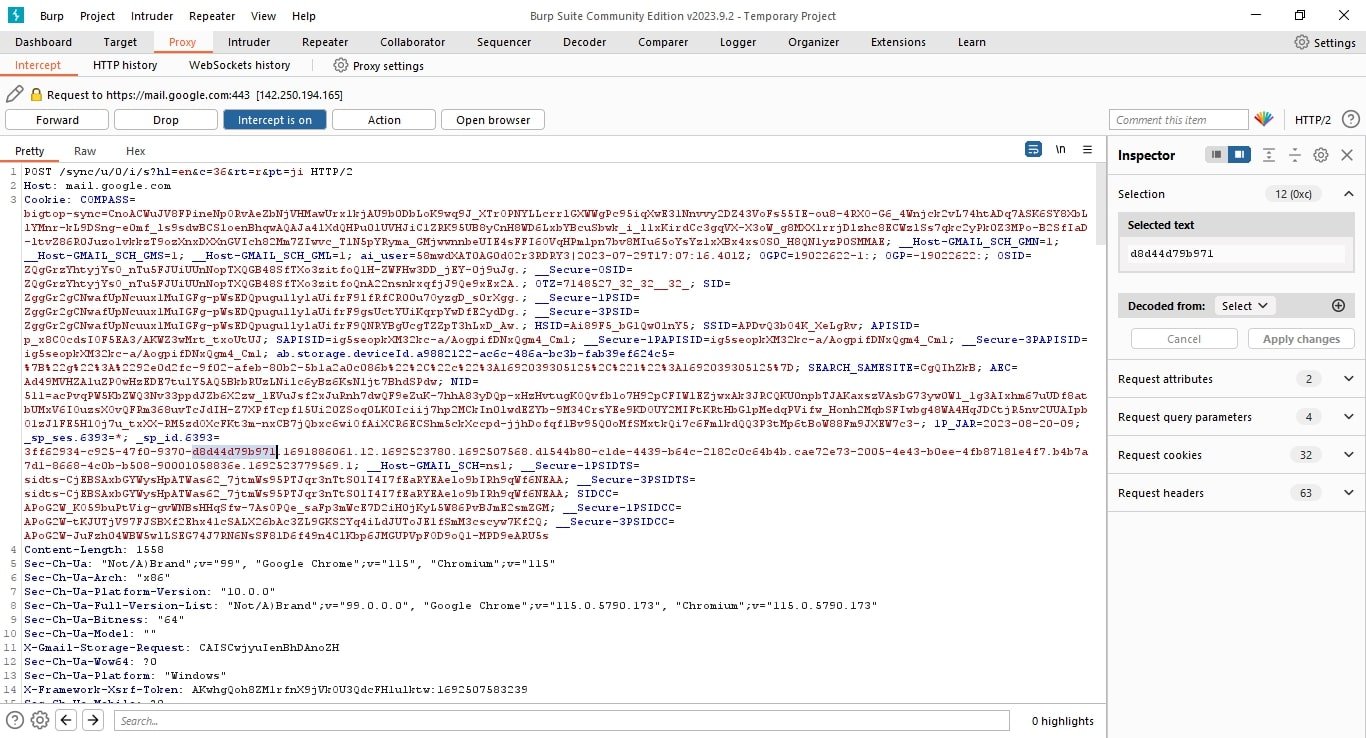
Now you will have to click on the forward button until you find your time code.
Once you see the time code like “1600859289000” or anything similar, copy that code and go to the epoch time converter.
After that, convert the code to human readable time and set a time that you want to send an email to…
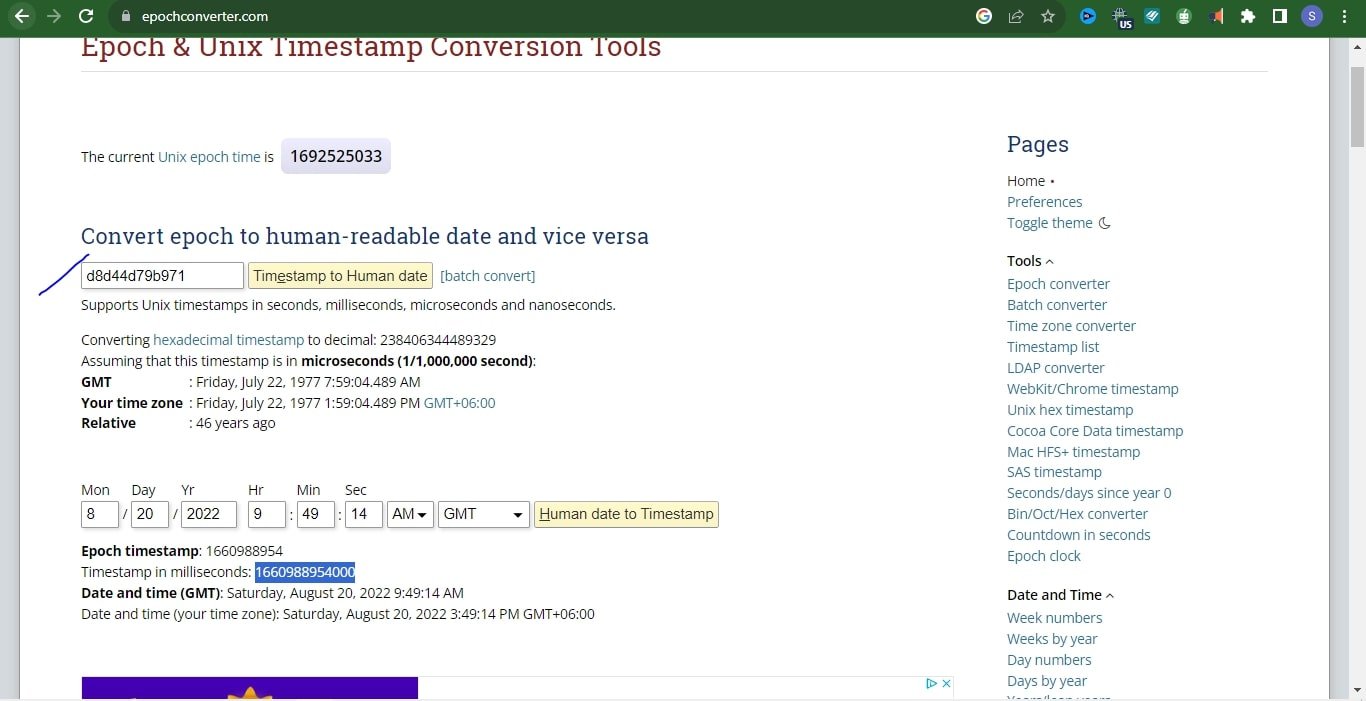
Now copy the timecode and replace it with the code on Burp. Now click the forward button again and switch off the interceptor.
Congratulations. That’s it. You have back date an email.
You can backdate the email using this method, but the recipient will see the actual receiving date.
You can watch the below video by Jasminder Pal Singh, who has found the pitfall of Google, to see how it works.
However, it did not work for us for an unknown reason (maybe Google fixed that glitch).
You can try it if emailing a previous date is more important.
Final Words: Can You Backdate an Email?
It’s 2024, And the mail providers and email marketing softwares are enhancing their system with time, so as of now, we cannot guarantee that there is any method that will let you backdate an email.
However, the method we shared with you has worked for many profound bloggers, and you can try it if you badly need to backdate an email.
Who knows, it may work for you!
Moreover, this content is only for educational purposes, we do not recommend or promote to back date an email. In many circumstances, it can be a legal offense, and installing a CA certificate can disrupt your security. So, try it at your own risk.


